Start with a simple idea, write a short script, create a storyboard, use free 3D software such as Blender, download properly licensed 3D assets and textures, animate your scene, render it, and finish the video with free editing and audio tools. Blender is free and open-source, and its license permits commercial use of artwork created with it.
The important point is that "free" does not mean effortless. Your biggest investments will usually be learning time, computer performance, creative skills, rendering time, and project complexity.
Can You Make 3D Animation Videos for Free?
Yes. You can create complete 3D animation videos using free and open-source software, free assets, and free editing tools.
For example, Blender provides modelling, materials, rigging, animation, lighting, camera control, rendering, compositing, and other parts of a 3D production workflow in one application.
A free workflow can work particularly well for:
Short 3D explainer videos
Product demonstrations
Simple character animation
3D motion graphics
Educational animations
YouTube videos
Social media content
Simple architectural scenes
Concept visualization
Student projects
Personal portfolios
However, there are practical limitations.
Blender's officially minimum recommendations for Windows operating system are 64-bit with 4 cores CPU, 8 GB RAM minimum, and a graphics card with at least 2 GB VRAM.
Let's take a look at the complete Blender's requirements for Windows operating system:
Factor | Minimum | Recommended |
OS | Windows 8.1 (64-bit) | Windows 11 |
CPU | 4 cores with SSE4.2 support | 8 cores |
RAM | 8 GB | 32 GB |
GPU | 2 GB VRAM with OpenGL 4.3 | 8 GB VRAM |
NOTE: For more OS (macOS, Linux) requirements details, you can visit the official website of Blender. Requirements are subject to change according to technology upgradation.
What Do You Need to Make a 3D Animation?
You do not need an expensive studio to start. A basic workflow can be built around the following components.
1. A Computer
3D animation places considerably more demand on your computer than ordinary video editing.
For beginner projects, focus on:
A modern multi-core processor
Sufficient RAM
A dedicated or capable integrated GPU
Adequate storage
Good cooling
Enough free disk space for project files and rendered frames
The exact requirements depend on the complexity of your scene. A simple object animation is much less demanding than a realistic character animation with simulations and high-resolution textures.
2. 3D Animation Software
You need software for creating or assembling your 3D scene.
Blender is particularly useful for beginners because it combines modelling, sculpting, texturing, rigging, animation, rendering, compositing, and more in one application. Blender is free and open source.
3. 3D Models and Assets
You can either model objects yourself or download existing assets.
Using existing assets can significantly shorten production time. For example, Poly Haven provides 3D models, textures, and HDRIs under CC0, allowing the assets to be used for commercial purposes without requiring attribution.
Always check the license of any asset you download from another website.
4. Textures and Materials
Textures control the visual appearance of your models.
Depending on the project, you may need:
Wood textures
Metal textures
Fabric textures
Concrete textures
Plastic materials
Glass
Skin materials
Surface imperfections
Realistic materials often depend on more than simply adding an image texture. Roughness, reflection, bump or normal maps, lighting, and material properties all influence the final appearance.
5. Animation Tools
Animation software lets you control movement using keyframes, rigs, constraints, curves, and other systems.
For example, you could animate:
A product rotating
A camera moving through a building
A character walking
Text appearing in 3D
A machine operating
A vehicle moving
A medical object changing position
6. Audio and Voiceover
Good animation is not only visual.
You may need:
Voiceover
Background music
Sound effects
Ambient sound
Mechanical sounds
Transition sounds
Audacity is a free, open-source audio editor available for Windows, macOS, and Linux.
7. Video Editing Software
After rendering your animation, you may need to combine clips, add audio, subtitles, transitions, titles, color adjustments, and other post-production elements.
Kdenlive is a free and open-source video editor that supports editing, effects, audio processing, titles, subtitles, transitions, and video rendering.
DaVinci Resolve also has a free version with substantial editing, color, audio, and finishing capabilities. Blackmagic Design states that its free version supports projects up to Ultra HD 3840 × 2160 at up to 60 fps, subject to the capabilities and limitations of the free version.
Which Are Best Free Tools for 3D Animation?
Instead of looking for one "best free 3D animation maker," think about the production pipeline.
Production Need | Free Option | What It Helps With |
|---|---|---|
3D creation | Blender | Modelling, rigging, animation, rendering |
3D assets | Poly Haven | Models, textures, HDRIs |
Character animation | Mixamo | Humanoid characters and animation |
Video editing | Kdenlive | Editing, effects, titles and export |
Video editing & finishing | DaVinci Resolve Free | Editing, color, audio and finishing |
Audio editing | Audacity | Voiceover and sound editing |
Blender: Free 3D Creation Software
Blender is one of the most complete options for a free 3D animation workflow. Blender is a proficient software in handling many 3D animation task from 3D modelling to UV mapping and Rendering to Motion graphics. It is a complete free package which provides end-to-end features to make free 3D animation videos.
According to Blender's community, an individual can use the software for commercial purpose, while the artwork you create remains your property.
Poly Haven: Free 3D Assets and Textures
Poly Haven is available with a little package of magic for learners, it provides a pre-made sort of raw material for beginner projects. This can help beginners concentrate on animation, composition, lighting, and storytelling rather than spending hours modelling every object.
The raw material inculdes models, HDRIs, and textures under CC0. Its current licensing information says the assets can be used for any purpose, including commercial work.
Mixamo: Character Animation
For humanoid character projects, Mixamo can reduce the technical barrier associated with character rigging and animation.
Adobe's FAQ states that Mixamo is available free with an Adobe ID and that its characters and animations can be used royalty-free for personal, commercial, and non-profit projects, subject to its terms and restrictions. Its auto-rigging and animation library is designed for bipedal humanoids.
NOTE: The license terms are subject to change at anytime. Always first check Adobe's current terms before starting a project.
Kdenlive: Free Video Editing
Kdenlive is useful when your rendered 3D animation needs additional editing. It is available for various tasks like Cut clips, Arrange scenes, Add music to Add sound effects, Create titles, and Add subtitles, etc., an individual can finally export the final video.
The current Kdenlive documentation describes it as free and open-source software and includes workflows for editing through final rendering.
How to Make 3D Animation Videos for Free?
It is time to checkout to the actual production workflow.
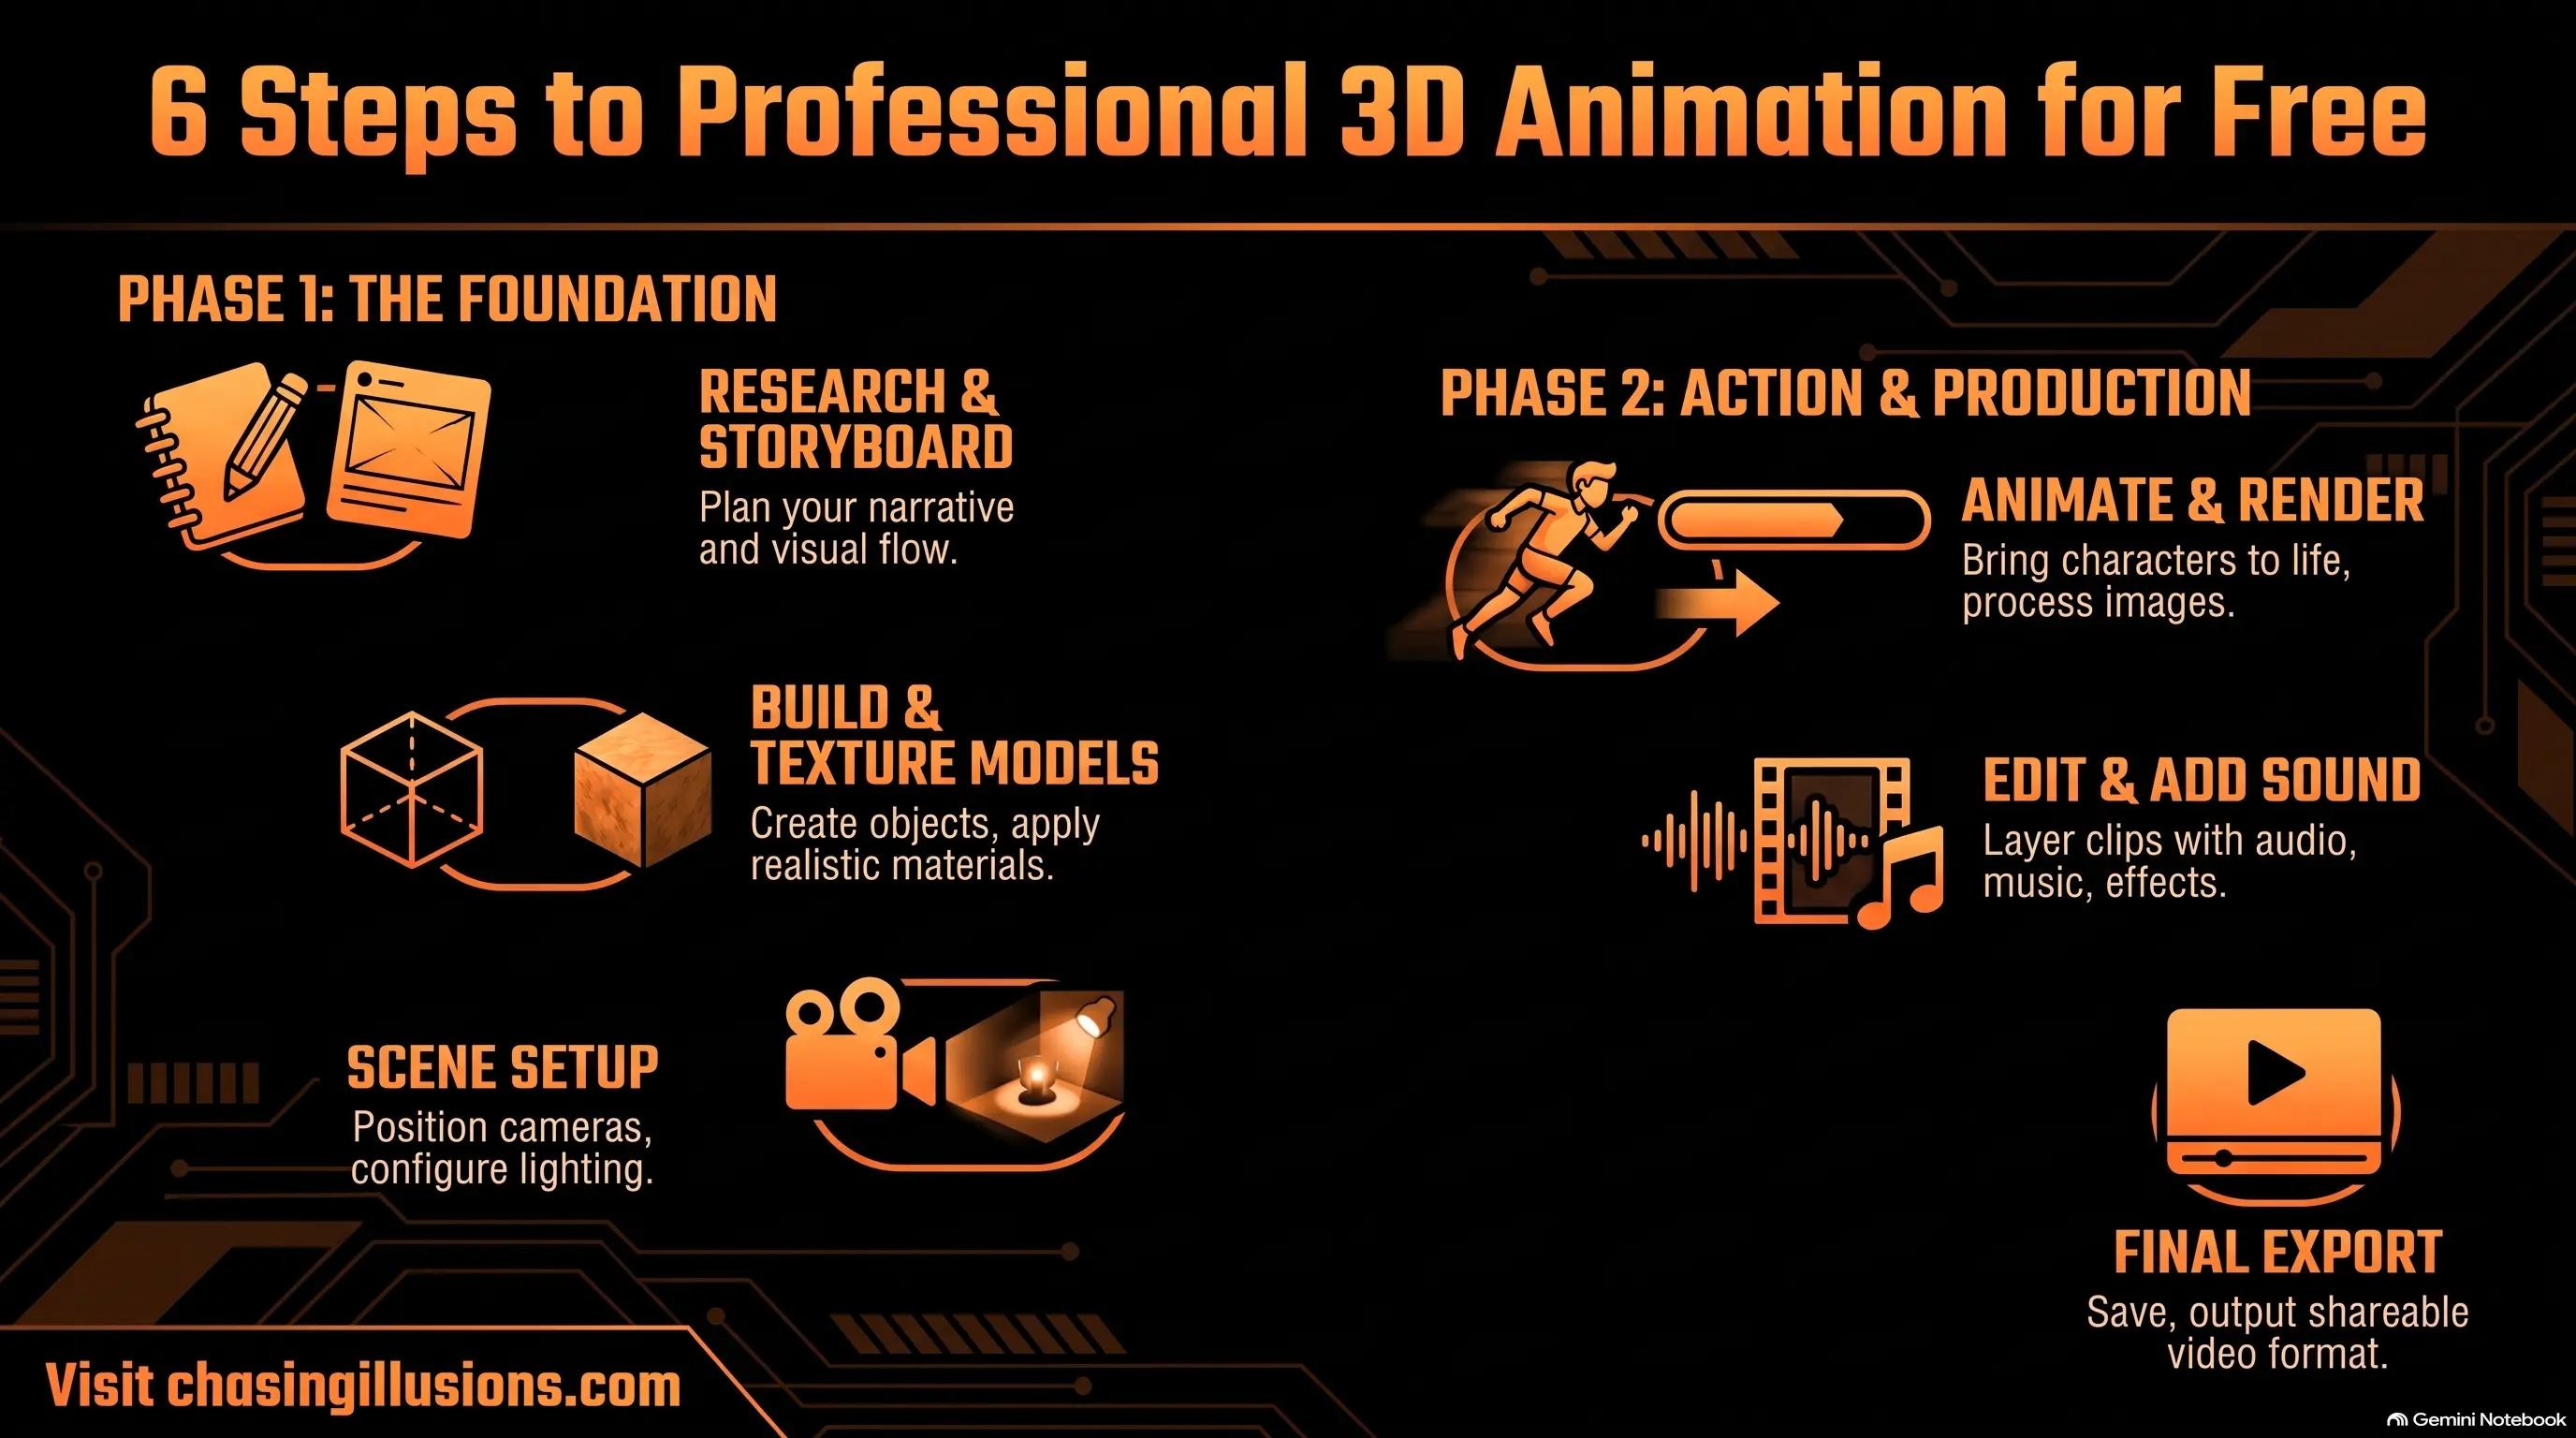
A simple beginner workflow looks like this:
Idea → Script → Storyboard → Assets → Modelling → Materials → Lighting → Camera → Animation → Rendering → Editing → Export
Step 1: Do Research or Go With Your Interest
Since you're at beginning stage, so don't pick a 10-12 minutes of projects. Instead start with small so that you can learn everything step by step easily.
Your first project could be like a rotating product or a bouncing ball and even you can go with a simple room walkthrough or a machine demonstration. Got hard one? Start with just animating a logo. Overall it is upto you, choose a project based on your interest and learning level.
For example:
"Show how a new water bottle works in 20 seconds."
That is easier to manage than:
"Create a five-minute realistic animated story with ten characters."
Step 2: Write a Short Script
A script is like an ingredients list of your food item and in that same way a script gives you a proper roadmap to follow the step by step animation structure and provides a smooth direction to pursue ahead in animation journey.
For a 20–30 second product animation, you might use:
Introduce the product.
Show the main problem.
Demonstrate the product.
Highlight the important feature.
End with the result.
NOTE: Keep the first project short. A shorter animation gives you more opportunity to focus on quality.
Step 3: Create a Storyboard
A storyboard translates the script into shots.
For each shot, decide:
What will the viewer see?
Where will the camera be?
What will move?
How long will the shot last?
What sound will accompany it?
The objective is to solve visual problems before spending hours creating 3D assets.
Step 4: Build or Import 3D Models
Now create your scene.
You have two choices:
Create your own models
Use Blender's modelling tools to create objects from basic shapes and more advanced techniques.
Import existing models
Download appropriately licensed models and adapt them to your project.
For beginners, combining the two approaches is often practical. Create the important custom object yourself and use existing assets for secondary objects.
Step 5: Apply Materials and Textures
A model without appropriate materials can look flat.
Set up properties such as:
Base color
Roughness
Metallic value
Reflection
Transparency
Normal or bump information
Avoid adding complicated textures simply because they look impressive. Materials should support the story and visual style.
Step 6: Set Up Lighting
Lighting can dramatically change the appearance of a 3D scene.
Start with a simple setup.
For example:
Key light
Fill light
Rim or back light
You can also use HDRIs for environment lighting. Poly Haven provides HDRIs under CC0, which can be useful for realistic lighting experiments.
The goal is not to add as many lights as possible. The goal is to make the subject readable and visually convincing.
Step 7: Position the Camera
Camera movement should have a purpose.
You can create:
Static shots
Push-ins
Pull-outs
Tracking shots
Orbit shots
Pan and tilt movements
Walkthrough sequences
Step 8: Animate Objects or Characters
This is where the scene becomes an animation.
For simple animation, keyframes are enough.
For example:
Frame 1: Product rotation = 0°
Frame 60: Product rotation = 180°
Frame 120: Product rotation = 360°
The software calculates the movement between those keyframes.
For character animation, you may use rigging, inverse kinematics, animation libraries, or motion capture workflows.
Step 9: Render the Animation
Rendering converts your 3D scene into image frames or video output.
Before rendering the entire animation, test a few frames.
Check:
Lighting
Shadows
Materials
Camera framing
Reflections
Object movement
Noise
Resolution
A low-quality test render can save hours of unnecessary rendering.
Step 10: Edit and Add Sound
Import your rendered clips into your video editor.
Then add:
Voiceover
Music
Sound effects
Titles
Captions
Transitions
Color adjustments
Audacity can be used for recording and editing audio, while Kdenlive or DaVinci Resolve can handle the final video editing workflow.
Step 11: Export the Final Video
For a general web or social media project, MP4 is often a practical delivery format.
Before exporting, check:
Resolution
Frame rate
Aspect ratio
Video codec
Audio format
Bitrate
File size
Do not automatically render everything at the highest possible resolution. Match your export settings to where the video will be published.
How to Make 3D Animation Without 3D Modelling?
You do not have to create every model yourself.
This is one of the easiest ways for beginners to reduce production time.
Use Existing 3D Assets
Download models from reputable libraries and check their licenses before using them.
For example, Poly Haven provides CC0 models, textures, and HDRIs.
Use Character Animation Libraries
Instead of learning character rigging immediately, beginners can use ready-made humanoid characters and animation systems.
Mixamo is one example. Adobe states that its characters and animations are available free and can be used in commercial projects subject to the applicable terms.
Use Templates and Procedural Workflows
Templates can provide starting points for:
Motion graphics
Camera movement
Product presentations
Transitions
Titles
Scene setups
Procedural techniques can also generate repeated objects or environments without manually modelling every element.
Use AI-Assisted Tools Carefully
AI can help with parts of the creative process, including:
Concept development
Image generation
Image-to-video experiments
Text-to-video experiments
Reference creation
Storyboarding
Voice generation
However, AI-assisted animation tools frequently have different free-tier limits, commercial-use conditions, watermarks, credits, and output restrictions.
Do not assume that an AI tool is commercially usable simply because it lets you generate content for free. Check the current license and terms before using the output in paid work.
Free 3D Animation vs Professional 3D Animation
Free software does not automatically mean poor-quality animation.
The more important differences usually involve production resources, expertise, asset quality, workflow, time, and project complexity.
Factor | Free Workflow | Professional Workflow |
|---|---|---|
Software | Free/open-source tools | Paid production software may be used |
Assets | Free or self-created assets | Custom or licensed production assets |
Modelling | Often self-produced | Dedicated modelling artists |
Character rigging | DIY or libraries | Specialist rigging workflows |
Animation | Individual creator or small team | Dedicated animation team |
Rendering | Local or limited resources | Larger rendering infrastructure |
Production time | Often longer | Can be reduced through specialization |
Technical support | Community/documentation | Dedicated support may be available |
Revisions | Depends on creator/team capacity | Structured revision pipeline |
Complexity | Best suited to manageable projects | Can support highly complex productions |
A skilled creator using free software can produce impressive results. Conversely, expensive software does not automatically produce good animation.
The determining factors are often creative direction, technical skill, production planning, assets, hardware, time, and execution.
Common Mistakes Beginners Should Avoid
Starting With an Overly Complex Project
Do not make your first project a 10-minute cinematic animation.
Start with a small project and increase complexity gradually.
Skipping the Storyboard
Without a storyboard, you may discover camera and composition problems after completing your 3D scene.
Plan your shots first.
Using Too Many Effects
Particles, motion blur, depth of field, simulations, glowing materials, and visual effects can be useful.
But adding everything at once can make an animation harder to understand.
Using Poor Lighting
Even a detailed 3D model can look unconvincing under poor lighting.
Learn basic lighting before experimenting with complicated setups.
Moving the Camera Too Much
Constant camera movement can make an animation difficult to follow.
Move the camera when the movement communicates something.
Using Too Many Assets
More objects do not necessarily make a scene better.
Every asset should have a purpose.
Ignoring Audio
Weak sound can make an otherwise good animation feel unfinished.
Use clear voiceover, appropriate music, and relevant sound effects.
Rendering at the Wrong Settings
Very high resolution and unnecessarily high-quality rendering can increase rendering time dramatically.
Test your settings before starting a full render.
How to Improve the Quality of a Free 3D Animation?
You do not need more software to improve every animation.
Start with fundamentals.
Improve Composition
Make the main subject immediately identifiable.
Use framing, scale, depth, and visual hierarchy to direct attention.
Improve Lighting
Use lighting to establish:
Subject separation
Depth
Mood
Form
Material appearance
Improve Camera Movement
Every camera movement should support the story.
A slow camera move can reveal a product. A tracking shot can explain a process. A controlled orbit can demonstrate an object's design.
Improve Animation Timing
Movement should have appropriate speed and rhythm.
Study:
Timing
Spacing
Acceleration
Deceleration
Anticipation
Follow-through
Improve Materials
Realistic materials depend on how surfaces respond to light.
Pay attention to roughness, reflections, texture scale, and surface imperfections.
Improve Sound Design
Add sound that supports the action.
A machine animation, for example, may benefit from mechanical sounds synchronized with movement.
Improve Storytelling
The viewer should understand:
What am I looking at?
What is happening?
Why does it matter?
If those questions are clear, the animation is already doing important work.
A Simple Free 3D Animation Workflow for Beginners
If you are completely new, you can start with this workflow:
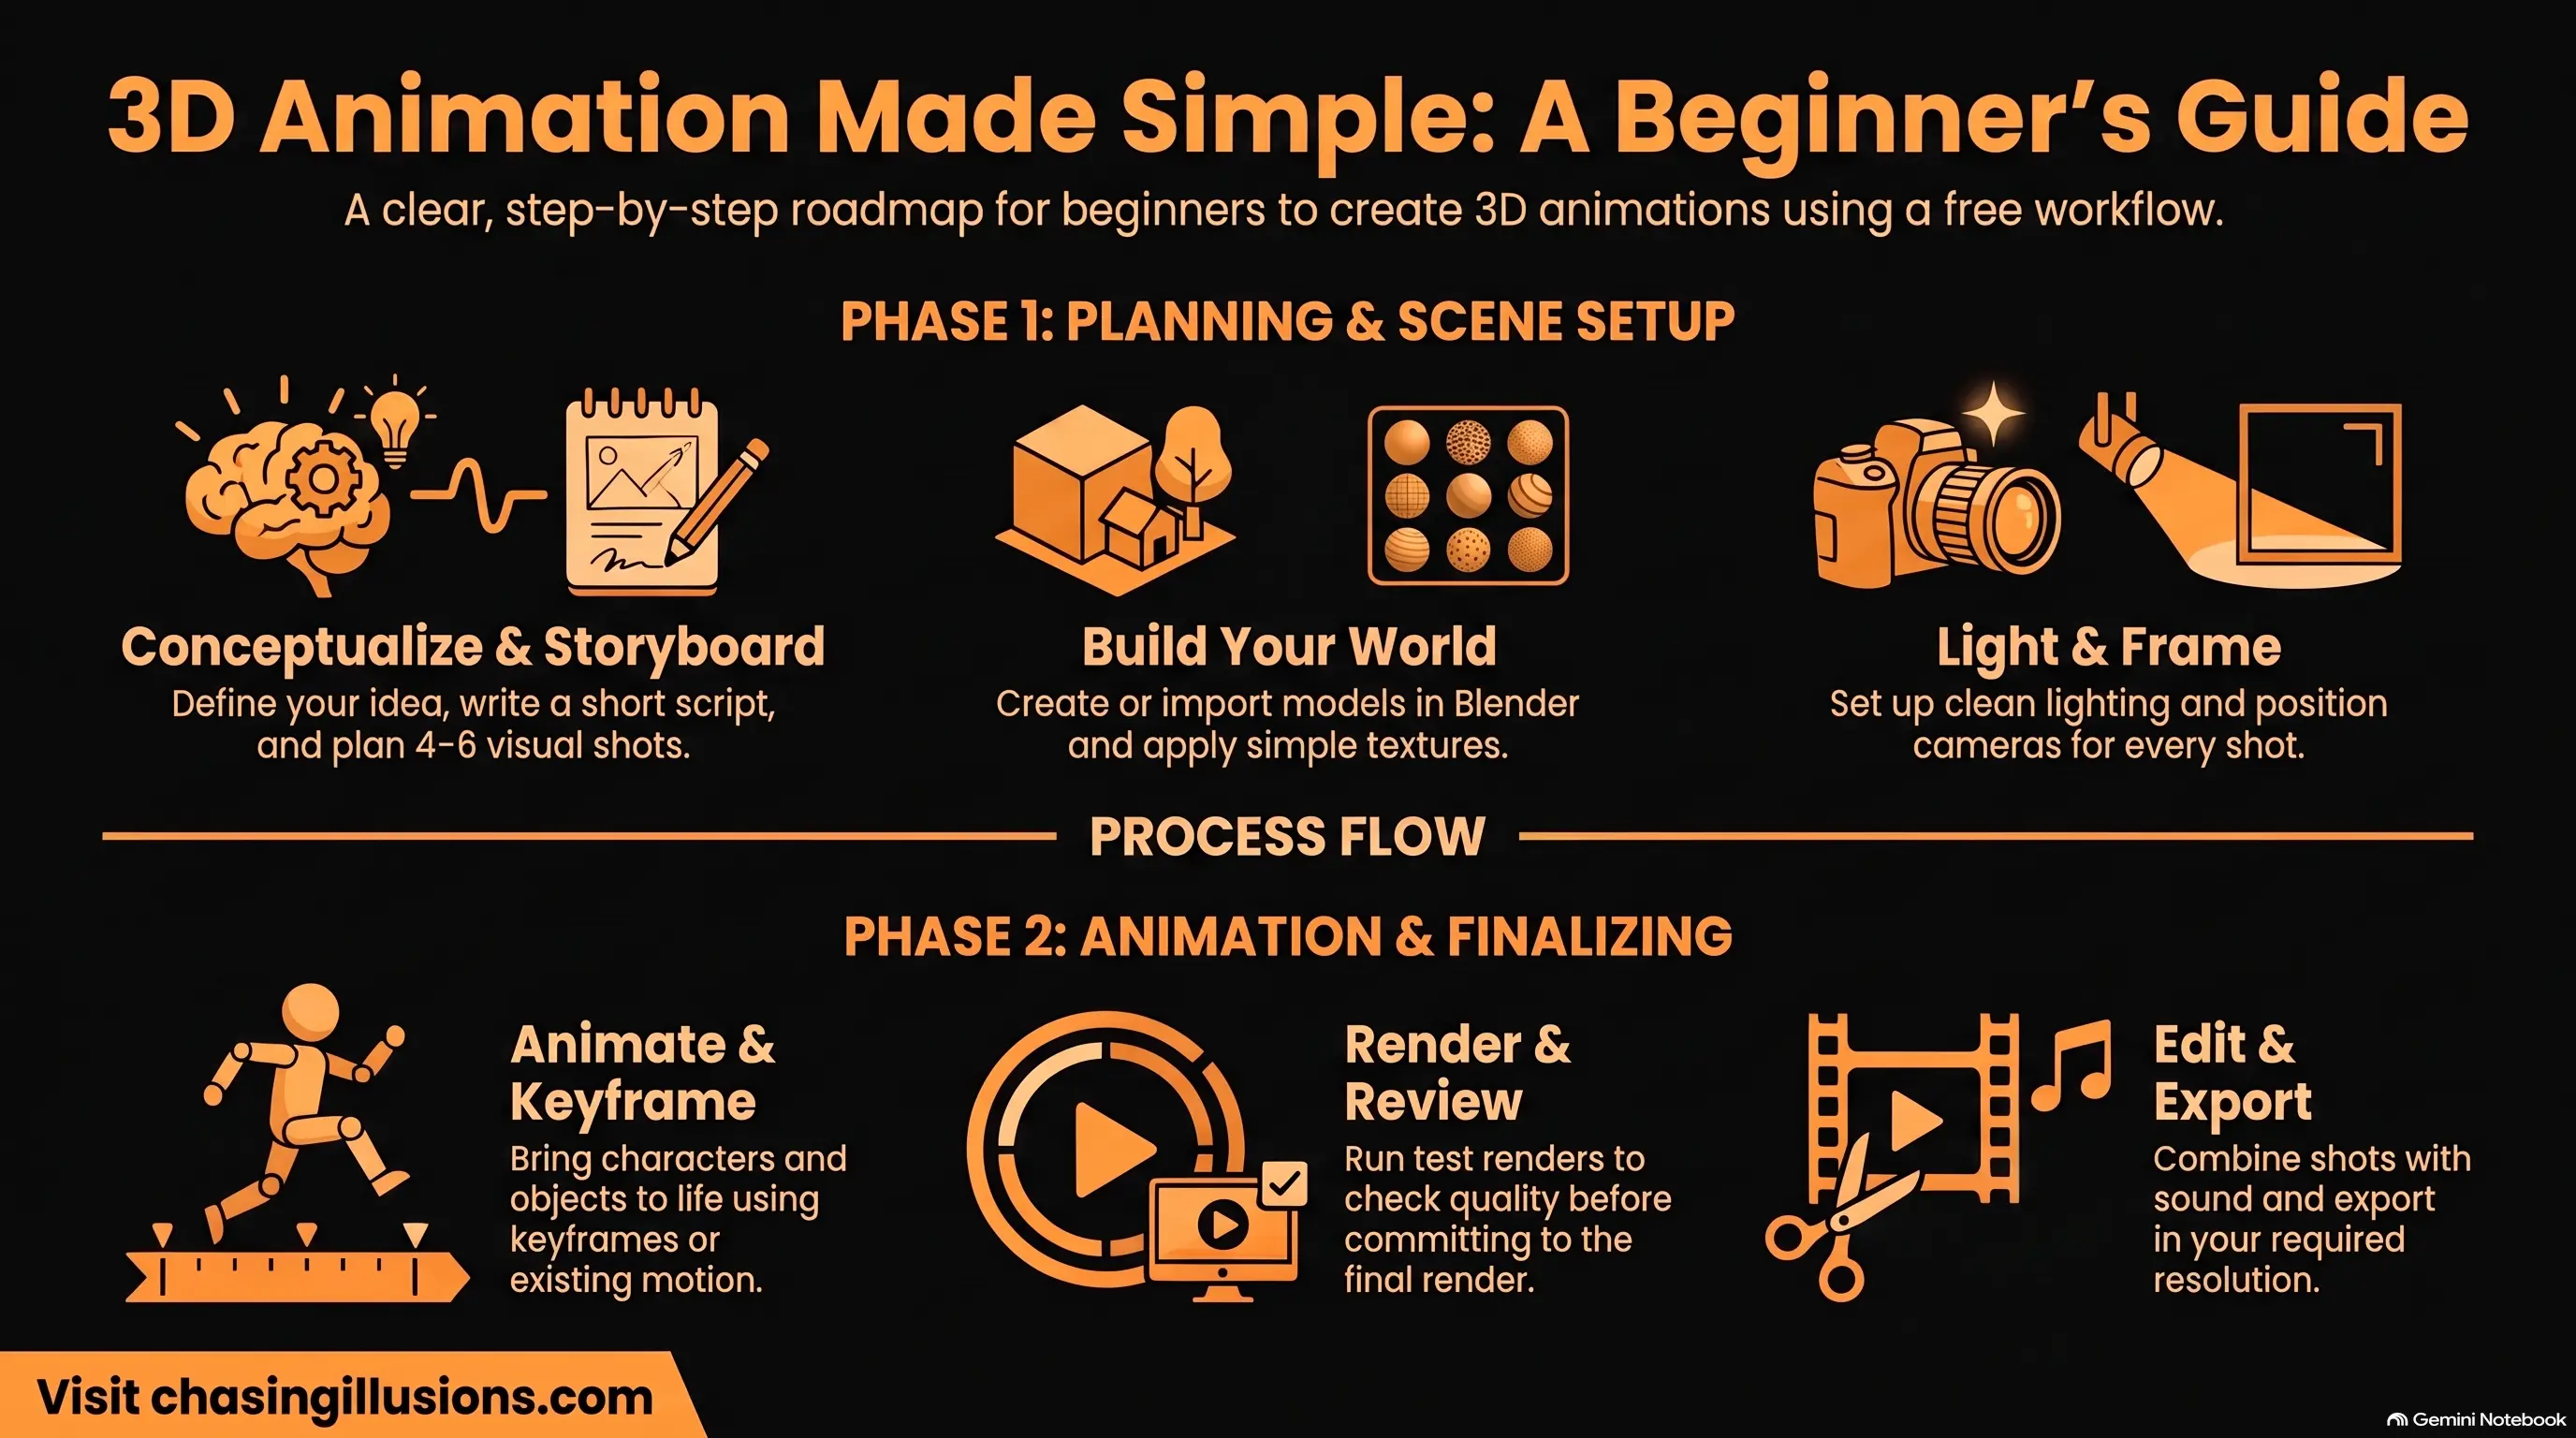
1. Idea
Choose one simple subject.
↓
2. Script
Write 20–30 seconds of narration or action.
↓
3. Storyboard
Plan 4–6 shots.
↓
4. Blender
Create or import your 3D models.
↓
5. Materials
Apply simple materials and textures.
↓
6. Lighting
Create a clean lighting setup.
↓
7. Camera
Frame each shot.
↓
8. Animation
Use keyframes or existing character animations.
↓
9. Render
Create test renders before the final render.
↓
10. Edit
Combine the shots and add sound.
↓
11. Export
Choose the resolution, frame rate, and format appropriate for your platform.
This workflow is enough to produce your first complete 3D animation without buying an expensive software package.
Frequently Asked Questions:
Can I make 3D animation completely free?
Yes. A workflow using free/open-source software such as Blender, free assets with suitable licenses, and free video and audio editors can be built without paying for software. However, hardware, electricity, optional assets, cloud rendering, or premium AI services can still create costs.
What is the best free 3D animation software for beginners?
Blender is a strong starting point because it combines modelling, materials, rigging, animation, rendering, compositing, and other 3D production capabilities in one free and open-source application.
Can I make 3D animation without knowing how to model?
Yes. You can use existing 3D models, asset libraries, character animation libraries, templates, and procedural workflows. This lets you concentrate on animation, lighting, camera work, and storytelling.
Can I use free 3D assets commercially?
It depends on the asset's license. For example, Poly Haven states that its assets are CC0 and can be used for commercial purposes. Other websites may have attribution requirements or restrictions, so always check the individual asset license.
Can I make a professional-looking animation with free software?
Yes, depending on the project. Free software can provide sophisticated production capabilities, but professional results still require appropriate skills, assets, hardware, planning, and production time.
Is AI useful for 3D animation?
AI can assist with concept development, references, storyboarding, image generation, video generation, and some production tasks. However, AI tools vary considerably in output quality, pricing, credits, licensing, and commercial-use permissions.
Conclusion:
You do not need an expensive software subscription or a large animation studio to start learning 3D animation.
A practical beginner workflow can be built around a simple idea, short script, storyboard, free 3D software, properly licensed assets, basic lighting, keyframe animation, rendering, and free post-production tools.
The biggest challenge is not finding another free 3D animation tool. It is learning how to combine modelling, materials, lighting, camera movement, animation timing, sound, and storytelling into one coherent production.
Start small. Make one simple animation. Learn from the mistakes. Then increase the complexity of your next project.
For businesses that need professionally produced 3D animation rather than learning the entire production workflow internally, Chasing Illusions Studio can help turn complex concepts into clear, engaging visual content.
Need help with a 3D animation project? Contact Chasing Illusions Studio to discuss your animation requirement.
Chasing Illusions Studio
Premium animation & video production studio based in Delhi, India. Specialising in 3D animation, medical visualisation, architectural walkthroughs, and CGI.